Guy Tel-Zur, March 26, 2024
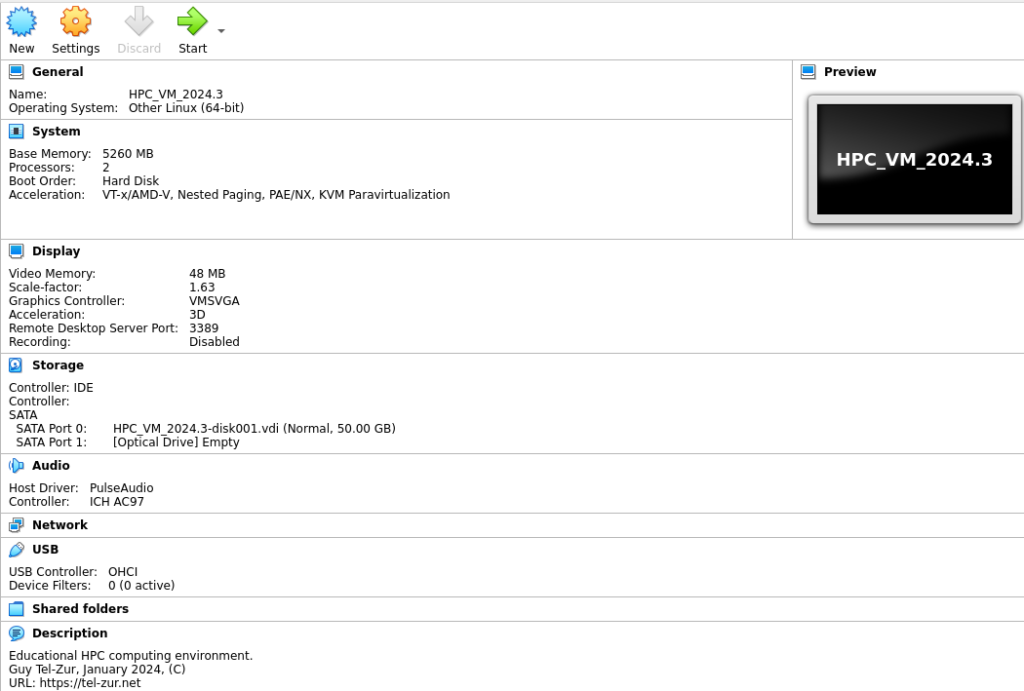
During the pandemic, when isolation took place, I was challenged how to keep my students practicing parallel processing programming in my “Introduction to Parallel Processing” course. The students couldn’t meet at the computer lab and so I developed a VirtualBox image with all the tools I needed for my course (a Linux machine with a compiler, MPI, HTCondor, and profiling tools such as TAU and Scalasca). This idea of a parallel processing full stack virtual machine (VM) is not unique or new, for example, there is an excellent tool from the E4S project. However, I preferred to create my own image that is customized to my syllabus. The VM allowed the students to import a ready to use infrastructure into their private computers with zero effort. The VM settings is shown in the next figure:
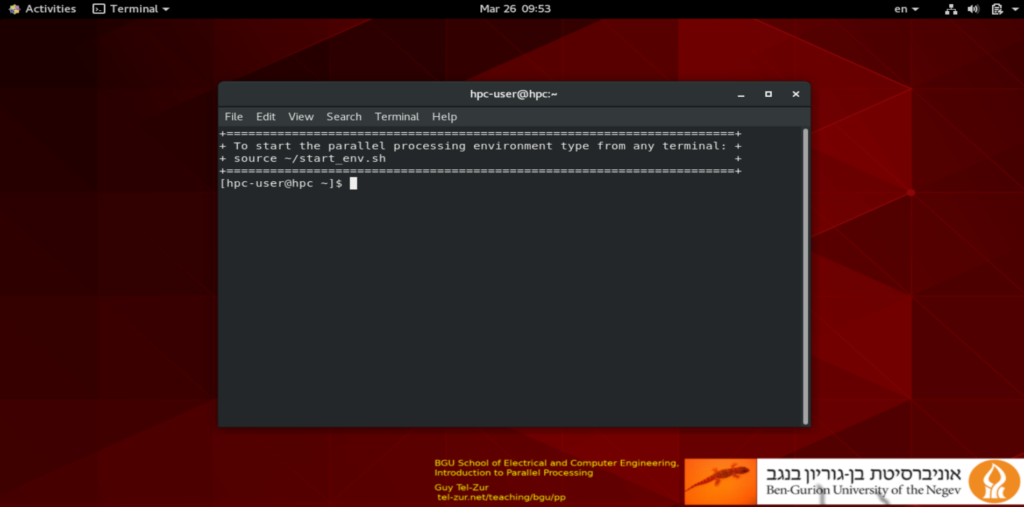
The VM desktop, which is based on CentOS 8 is shown here:
Since then, I kept using and upgrading this tool as an easy alternative to the full scale educational departmental cluster. Of course, this isn’t a tool for breaking performance records but it is quiet convenient for educational purposes. However there are some limitations: First, the VM can not work on too old computers. The minimum requirements are at least 4GB RAM, 2 cores and a few tens of GB storage. Another significant limitation is that it isn’t possible to test the scaling of the codes as one increases the number of parallel tasks (because it was limited to only 2 cores). Therefore, important terms like speedup and efficiency could not be demonstrated. Nevertheless, I decided to preserve this concept of a full stack single machine which is easy to use as a complimentary tool, but I wanted to also migrate it to the cloud so that anyone would be able to test the instance also with many cores! Transferring the VM to the cloud turned out to be a challenging task and I decided to summarize it here in order to ease your life in case that you also would want to convert a VirtualBox image (as an ova file) to an Amazon Web Services (AWS) machine image (AMI). Hopefully, after reading this post you will be able to complete that task in a fraction of the time I spent resolving all the challenges.
Step 1: Export the VM to an OVA (Open Virtualization Format) file. This part is easy, just click on “File” –> “Export Appliance”. It is a good practice to remove the .bash_history file before exporting the VM so that you will clear the history of the commands you used prior to the that moment.
Step 2: Assuming that you already have an account on AWS and that you installed AWS command line tools and credentials then create a S3 bucket and copy your ova file into that bucket:
aws s3 cp ./HPC_VM_2024.3.ova s3://gtz-vm-bucket/This may take a few minutes, be patient.
Step 3: Security matters. You are asked to create a policy and a role to handle the image:
aws iam create-role --role-name vmimport --assume-role-policy-document file://trust-policy.jsonWhere the policy JSON file is:
$ more ./trust-policy.json
{
   "Version": "2012-10-17",
   "Statement": [
      {
         "Effect": "Allow",
         "Principal": { "Service": "vmie.amazonaws.com" },
         "Action": "sts:AssumeRole",
         "Condition": {
            "StringEquals":{
               "sts:Externalid": "vmimport"
            }
         }
      }
   ]
}
You can read more about this step here. You also need to define a role in another JSON file:
{
   "Version":"2012-10-17",
   "Statement":[
      {
         "Effect":"Allow",
         "Action":[
            "s3:GetBucketLocation",
            "s3:GetObject",
            "s3:ListBucket"
         ],
         "Resource":[
            "arn:aws:s3:::aria-images",
			"arn:aws:s3:::aria-images/*"
         ]
      },
      {
         "Effect":"Allow",
         "Action":[
            "ec2:ModifySnapshotAttribute",
            "ec2:CopySnapshot",
            "ec2:RegisterImage",
            "ec2:Describe*"
         ],
         "Resource":"*"
      }
   ]
and the command to set it is:
aws iam put-role-policy --role-name vmimport --policy-name vmimport --policy-document file://role-policy.jsonStep 4: Now it is time to convert the ova in S3 into an AMI using this command:
aws ec2 import-image --description "HPC_VM_2024.3" --disk-containers "file://./containers.json"A few seconds after hitting ‘enter’ you will see, as a response with your new AMI name. Look for “import-ami-XXXXXXXXX”. A typical response looks like this:
{
    "Description": "HPC_VM_2024.3",
    "ImportTaskId": "<strong>import-ami-01478e05448530ae4</strong>",
    "Progress": "1",
    "SnapshotDetails": [
        {
            "Description": "Guy Tel-Zur - Parallel Processing Education",
            "DiskImageSize": 0.0,
            "Format": "OVA",
            "UserBucket": {
                "S3Bucket": "gtz-vm-bucket",
                "S3Key": "HPC_VM_2024.3.ova"
            }
        }
    ],
    "Status": "active",
    "StatusMessage": "<strong>pending</strong>"
}
The content of containers.json is:
[
  {
    "Description": "My Parallel Processing OVA",
    "Format": "ova",
    "UserBucket": {
        "S3Bucket": "gtz-vm-bucket",
        "S3Key": "HPC_VM_2024.3.ova"
    }
}]
Replace the Description, S3Bucket, and S3Key fields with your preferences.
Step 5: Checking the progress. At this step you can execute this status checking command:
$ <strong>aws ec2 describe-import-image-tasks --import-task-ids import-ami-01478e05448530ae4</strong>
{
    "ImportImageTasks": [
        {
            "Description": "HPC_VM_2024.2",
            "ImportTaskId": "import-ami-01478e05448530ae4",
            "Progress": "19",
            "SnapshotDetails": [
                {
                    "DiskImageSize": 20736632320.0,
                    "Format": "VMDK",
                    "Status": "active",
                    "UserBucket": {
                        "S3Bucket": "gtz-vm-bucket",
                        "S3Key": "HPC_VM_2024.2.ova"
                    }
                }
            ],
            "Status": "active",
            "StatusMessage": "<strong>converting</strong>",
and see that “pending” was changed to “converting” which is a good sign.
But then came problems…
The image was not correctly prepared for the conversion into an AMI and I got the following error message:
$ aws ec2 describe-import-image-tasks --import-task-ids import-ami-01478e05448530ae4
{
    "ImportImageTasks": [
        {
            "Description": "HPC_VM_2024.2",
            "ImportTaskId": "import-ami-01478e05448530ae4",
            "SnapshotDetails": [
                {
                    "DeviceName": "/dev/sde",
                    "DiskImageSize": 20736632320.0,
                    "Format": "VMDK",
                    "Status": "completed",
                    "UserBucket": {
                        "S3Bucket": "gtz-vm-bucket",
                        "S3Key": "HPC_VM_2024.2.ova"
                    }
                }
            ],
            <strong>"Status": "deleted",
            "StatusMessage": "ClientError: BLSC-style GRUB found, but unable to detect default kernel"</strong>,
            "Tags": []
        }
    ]
The way to resolve this error is to return to VirtualBox, boot the image and make modifications as root. By default, the GRUB_ENABLE_BLSC is set to true in the /etc/default/grub file. When this variable is set to true, GRUB2 uses blscfg files and entries in the grub.cfg file. To resolve the ClientError: BLSC-style GRUB error on import or export, set the GRUB_ENABLE_BLSC parameter to false in the /etc/default/grub file so: open /etc/default/grub file with a text editor, such as nano and modify GRUB_ENABLE_BLSC parameter to false. Then, run the following command to rebuild the grub config file:
grub2-mkconfig -o /boot/grub2/grub.cfgTo read more about this issue click here. Now, shut down the VM and repeat steps 1..5 (this is time consuming and tedious).
Then, I had another “surprise”. Because I upgraded the image over the years the VM had several kernels but sadly the one that is supported by AWS wasn’t installed. In my case I got this error message:
"StatusMessage": "ClientError: Unsupported kernel version 5.4.156-1.el8.elrepo.x86_64",It turns out the AWS supports only a specific kernel for each Linux distribution, check here:
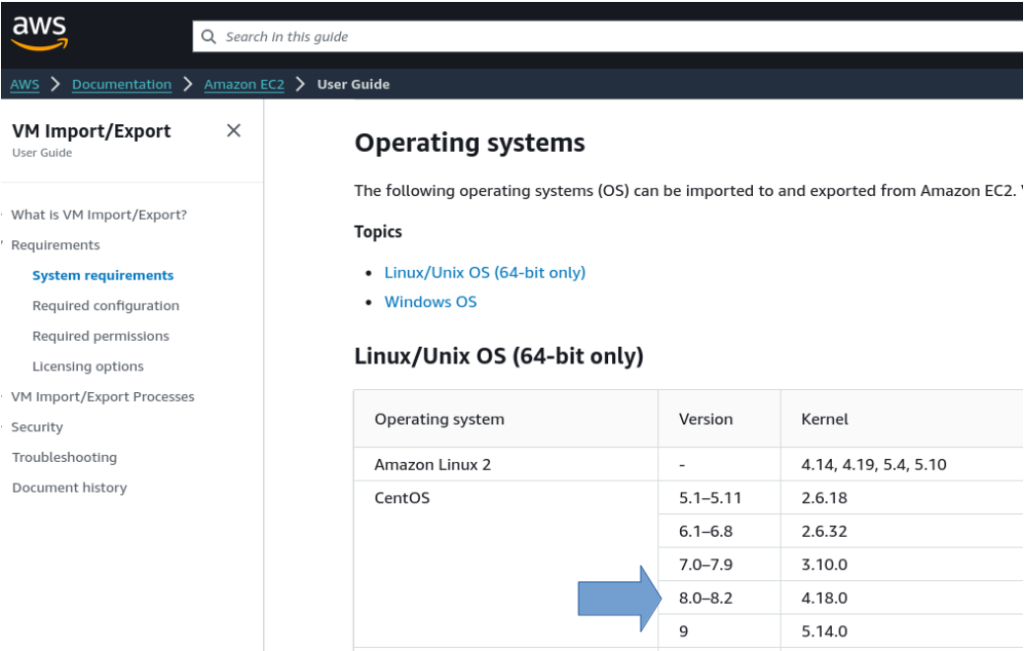
So I had to downgrade the kernel to 4.18.0 and make this kernel as the default when booting the image. Then, I had to repeat, once again, steps 1..5. Unfortunately, that wasn’t enough! The conversion process failed again and this time due to the presence of the other kernels. I had to completely remove all the other kernels and to be left only with the 4.18.0 kernel. Even the rescue kernel disturbed the conversion process:
"StatusMessage": "ClientError: Unsupported kernel version 0-rescue-c02fbb5c652549588dbb069f20f31872",So I had to go back again to the VirtualBox image and to erase all the other kernels and repeat steps 1..5 🙁 🙁
This time it want well until the end!!!
{
"ImportImageTasks": [
{
"Architecture": "x86_64",
"Description": "HPC_VM_2024.3",
"ImportTaskId": "import-ami-079a7bf1190f50bbf",
"LicenseType": "BYOL",
"Platform": "Linux",
"Progress": "27",
"SnapshotDetails": [
{
"DeviceName": "/dev/sda1",
"DiskImageSize": 20776996864.0,
"Format": "VMDK",
"Status": "<strong>completed</strong>",
"UserBucket": {
"S3Bucket": "gtz-vm-bucket",
"S3Key": "HPC_VM_2024.3.ova"
}
}
],
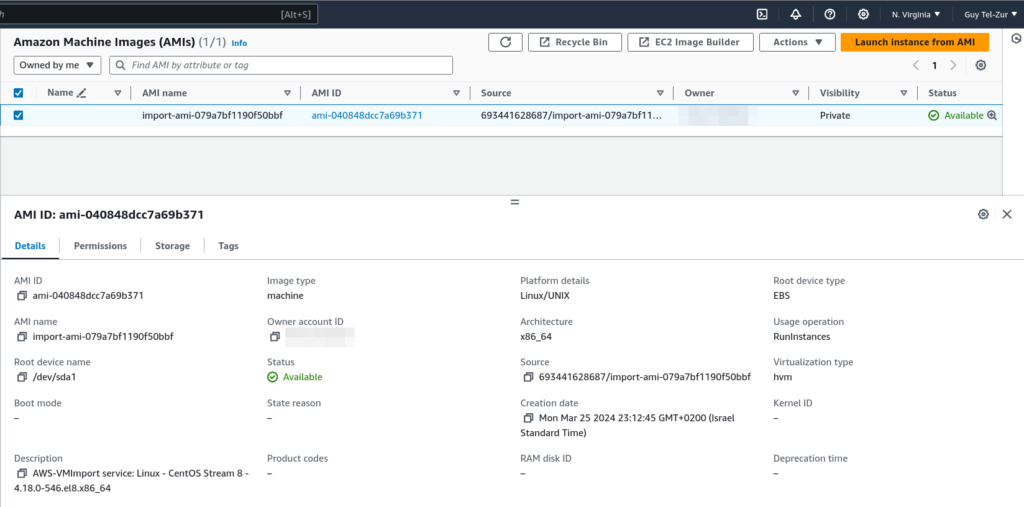
"Status": "<strong>active</strong>",Congratulations! Now we can go to AWS dashboard and find our new AMI in the EC2 panel:
In order to test the AMI click on “Launch instance from AMI”. The first instance I tried was a t2.micro just for testing the connection. A simple ssh connection from the terminal was successful using the the generated key pair:
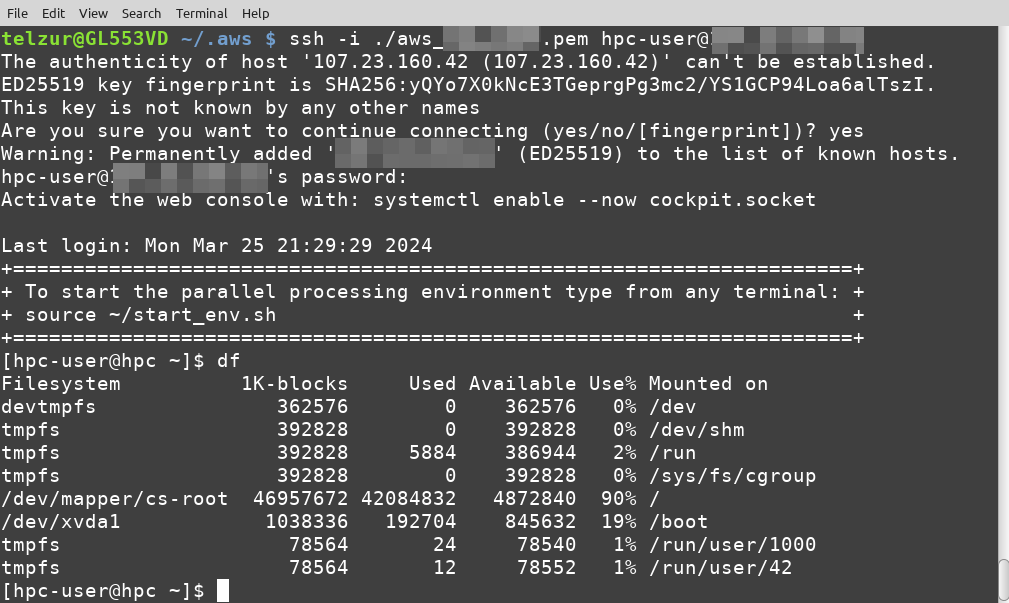
Then, I wanted to test the image in its full glory, so I created another instance, this time with 8 cores (t2.2xlarge). This node will exceed the performance of the VirtualBox image and this was the motivation for the whole exercise:
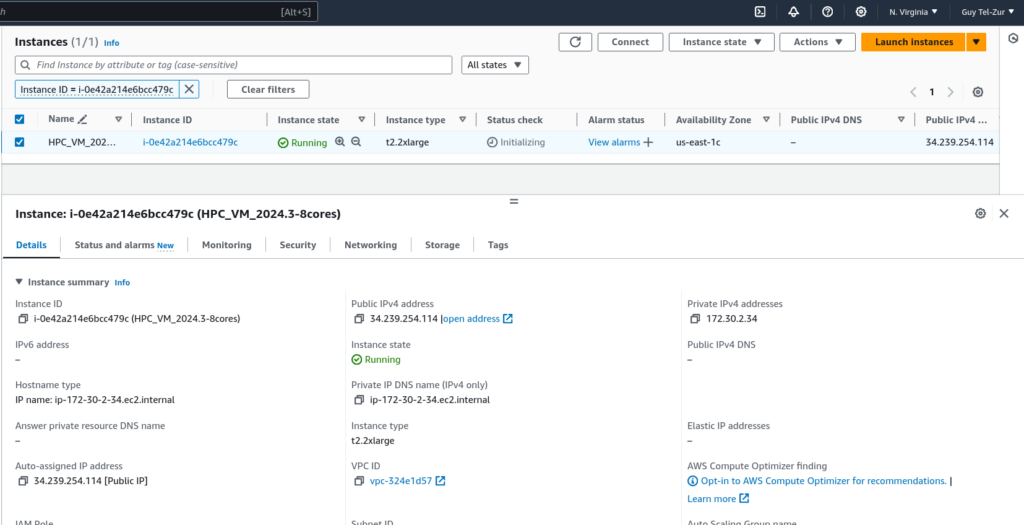
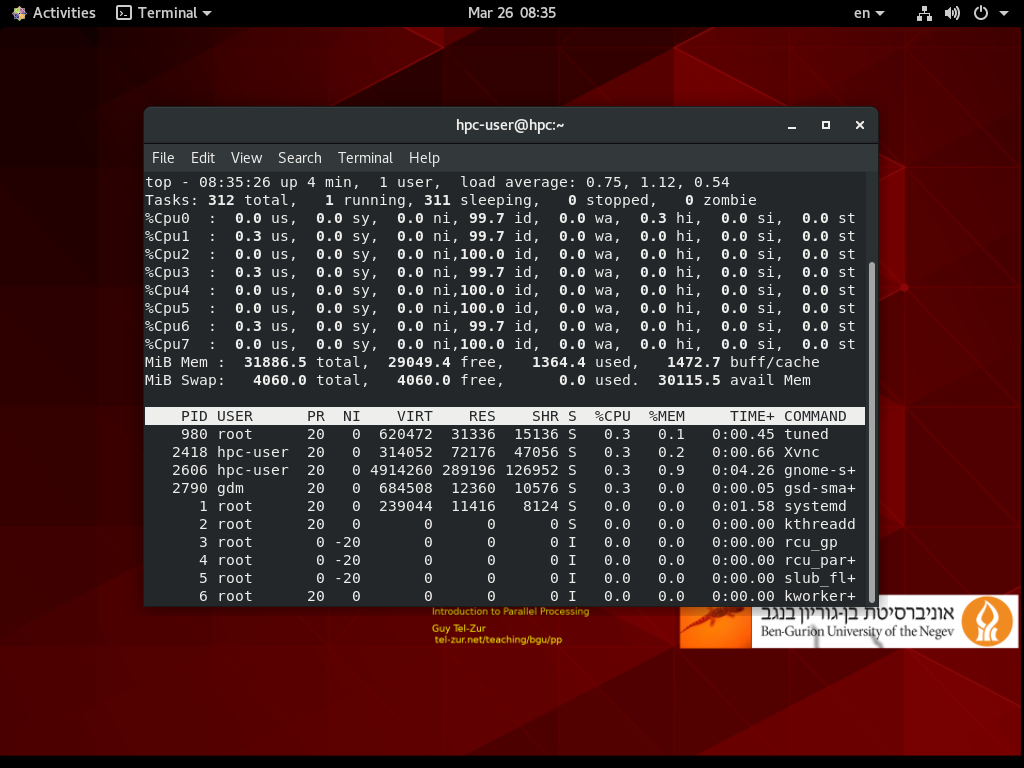
Indeed now there are 8 happy cores running:
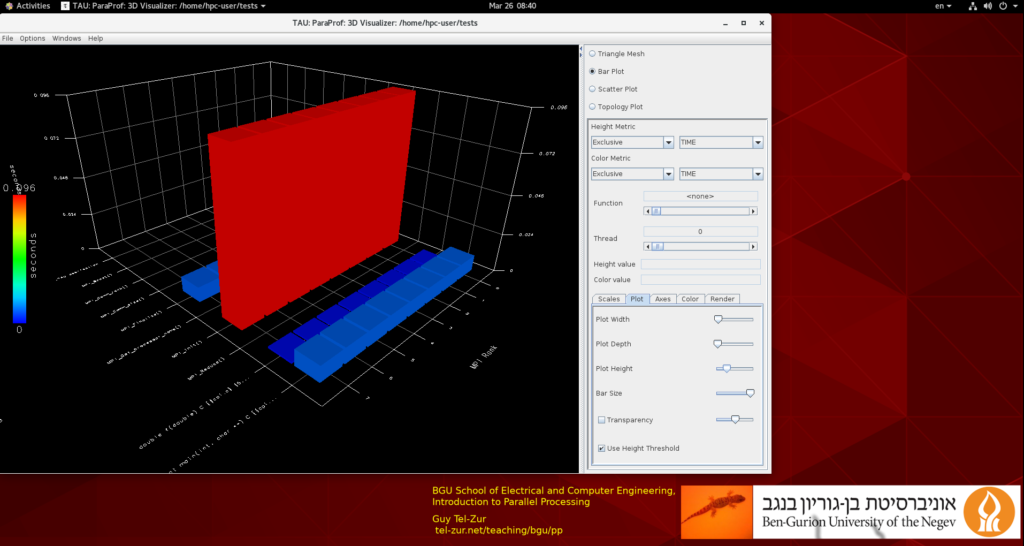
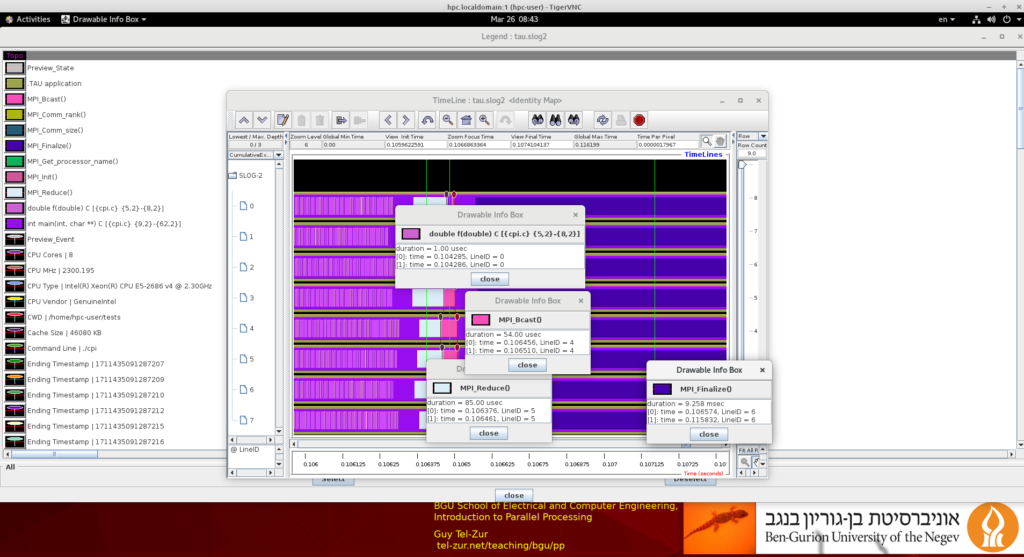
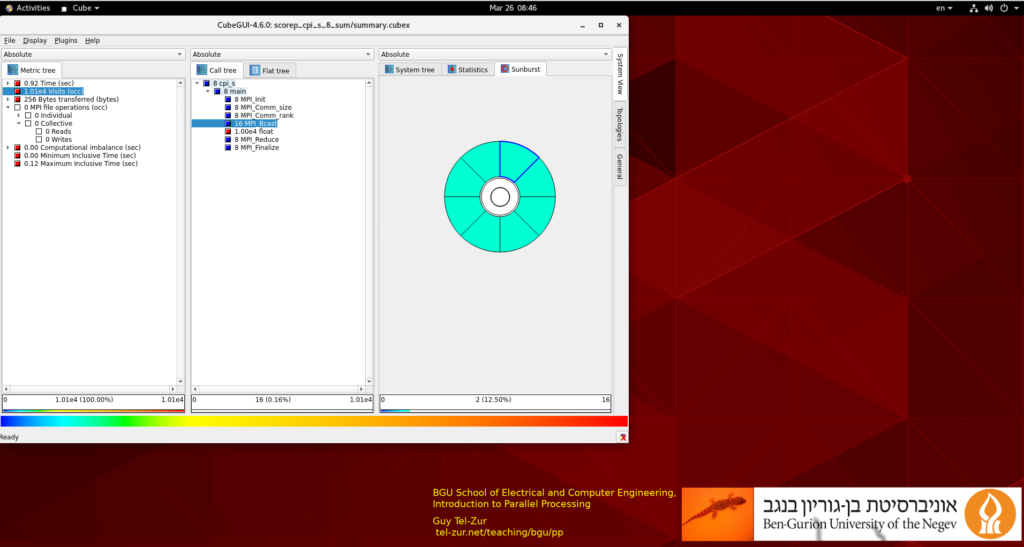
Now it is time for a few parallel computing tests. For that, I used the famous cpi.c program. In the following 3 figures results from TAU, Jumpshot, and Scalasca profiling tools correspondingly are shown:
Mission achieved! That’s it for now. For further reading check this link.
If you enjoyed this article you are invited to leave a comment below. You can also subscribe to my YouTube channel (@tel-zur_computing) or connect with me on X and on Linkedin.
Good luck!